mySQL


The database connection information. Normally the DB Host will not be localhost, but will be some remote server URL.
The user name and database will normally be ‘orca’ but could be something else depending on who set up the database.
The apply button is used if you make changes to the above parameters


Indication of whether the database connection is valid or not. You can temporarily disable the database connection if you don’t want a connection and don’t want to remove the mySQL object from the configuration.


This will remove your machine’s entry in the database and reenter it. Mostly here for testing.
How to set up a local database
The only database in existence at the time of this writing is at UNC on the ORCA development machine. You will probably want to set up your own local database. Here’s how:
-
1)Download and install mySQL
Go to the mySQL downloads site and grab a MacOS X mySQL installer. At the time of this writing the URL was:
http://dev.mysql.com/downloads/mysql/5.1.html#macosx-dmg
and the item to download was:
Mac OS X ver. 10.6 (x86, 32-bit), DMG Archive
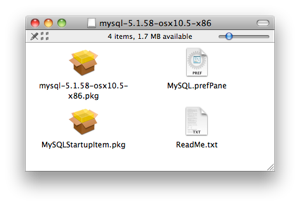
Once you have the dmg downloaded, open it and install the mySQL package, the preferencePane, and the startup item. You should read the included ‘ReadMe.txt’ file.
Go to the System Preferences and start the mySQL server.
-
2) Modify your login profile paths to include mySQL
Add the following as the last line in ~/.profile
export PATH=“/usr/local/bin:/usr/local/sbin:/usr/local/mysql/bin:$PATH“
-
2) Create the main mySQL user
open the terminal window and do the following (replacing “pwd” with the pwd of your choice):
>mysql -u root
mysql> GRANT ALL ON orca.* TO orca@localhost identified by "pwd";
mysql> GRANT ALL ON orca.* TO orca@"%" identified by "pwd";
mysql> flush privileges;
mysql> exit;
-
-
3) Use ORCA to build all the tables
Start ORCA on the machine that you just installed mySQL.
Add the mySQL object
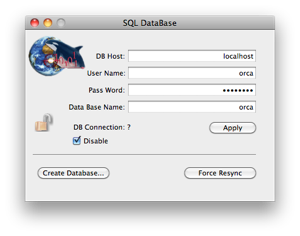
Fill in the fields like this, making sure that you use ‘localHost’ as the URL, and make sure you check the Disable button for this step. Click Apply.
Note that the database does NOT need to be on a machine that is normally running ORCA. This is just for setting up the database tables. Once the database is established you will be most likely be running ORCA on another machine and the DB Host field would reference the actual database URL.
-
4)Click the Create Database button
-
Confirm that you want to create a new database. You should see the following in the ORCA status log:
-
072111 19:34:31 Created Table machines in Database orca
072111 19:34:31 Created Table Runs in Database orca
072111 19:34:31 Created Table Alarms in Database orca
072111 19:34:31 Created Table Processes in Database orca
072111 19:34:32 Created Table Experiment in Database orca
072111 19:34:32 Created Table Histogram1Ds in Database orca
072111 19:34:32 Created Table Histogram2Ds in Database orca
072111 19:34:32 Created Table SegmentMap in Database orca
072111 19:34:32 Created Table Waveforms in Database orca
072111 19:34:32 Created Table StatusLog in Database orca
The un-check the Disable button. You should now be able to go back into the terminal window and look at the database and see an entry for your machine:
mysql -u root
mysql> use orca;
Database changed
mysql> show tables;
+----------------+
| Tables_in_orca |
+----------------+
| Histogram1Ds |
| Histogram2Ds |
| Processes |
| alarms |
| experiment |
| machines |
| runs |
| segmentMap |
| statuslog |
| waveforms |
+----------------+
10 rows in set (0.00 sec)
mysql> select * from machines;
+------------+-------------+-------------------+---------------+----------+--------+-------------------+
| machine_id | name | hw_address | ip_address | password | uptime | version |
+------------+-------------+-------------------+---------------+----------+--------+-------------------+
| 1 | MarksLaptop | 00:17:f2:d2:42:17 | 192.168.1.105 | NULL | 596 | 9.2.1h:5272:5274M |
+------------+-------------+-------------------+---------------+----------+--------+-------------------+
1 row in set (0.00 sec)
To make the database available for iORCA and web access you need to do the following:
-
5) Enable php support
-
As root edit: /etc:apache2:httpd.conf
-
Scroll down to line 114 and remove the hash sign (#)
-
-

-
-
-
-
-
It should now look like this:
-
-
LoadModule php5_module libexec/apache2/libphp5.so
-
-
Save the file.
-
In the terminal, type the following:
cd /private/etc
sudo cp php.ini.default php.ini
This moves you into the private:etc folder, and then copies php.ini.default to php.ini in the same folder.
-
6)Go into the System Preferences > Sharing and turn on Web Sharing
-
-
7)download the iOrca php access script from OrcaDbAccess.zip. Unzip it and copy to your ‘sites’ folder.
-
-
8)download the OrcaWeb site from OrcaWeb.zip. Unzip it and copy to your ‘sites’ folder.
That should do it. You should now have web access to the data base via a URL like:
http://orca.physics.unc.edu/~username/OrcaWeb/index.html
and for iORCA access:
http://orca.physics.unc.edu/~username/OrcaDbAccess/
Where username is the user of sites folder and ‘orca.physics.unc.edu’ is replaced by your database host machine. Depending on your setup you may have to edit the .php script in the OrcaDbAccess folder to have the right db name and password.
This will create any missing tables from your database. Normally you would not need to use this feature unless you are adding tables or recreating a database from scratch. This button does no harm if the database is already in place.